Photography Guide to Flores: Instagram-Worthy Spots and Pro Tips for 2026
Welcome to the ultimate Flores photography guide — your complete resource for capturing stunning images across Indonesia’s most photogenic island. Discover the most photogenic locations across Flores Island and capture breathtaking images that will transform your portfolio and Instagram feed forever.
Imagine standing at the edge of a volcanic crater as the sun rises, painting three mystical lakes in shades of turquoise, emerald, and onyx. Picture yourself hovering a drone above rice terraces that form perfect spiderweb patterns found nowhere else on Earth. Envision capturing the weathered faces of traditional elders in remote villages where ancient customs remain unchanged for centuries. This is Flores — Indonesia’s best-kept secret for travel photographers seeking raw, unfiltered beauty.
Whether you’re a professional photographer chasing that National Geographic shot, an Instagram influencer building your brand, or a passionate hobbyist documenting your travels, Flores offers an unmatched diversity of subjects. From the legendary Komodo dragons to pristine pink sand beaches, from tri-colored volcanic lakes to traditional thatched villages perched in misty mountains, every corner of this East Nusa Tenggara paradise tells a story worth capturing.
In this comprehensive photography guide, we’ll reveal the exact locations, timing, camera settings, and insider secrets you need to capture Flores’ most stunning vistas. You’ll learn when to visit Kelimutu for that perfect misty shot, how to approach cultural photography respectfully in traditional villages, and which hidden beaches offer the most surreal sunset colors. By the end of this guide, you’ll have a complete roadmap for creating a visual story that captures the soul of Flores.
Why Flores is a Photographer’s Paradise
Unlike Bali or Lombok where iconic shots have been captured millions of times, Flores remains refreshingly authentic and visually unexplored. The island’s dramatic topography creates natural compositions that would take hours to set up in a studio — here, Mother Nature does the work for you.
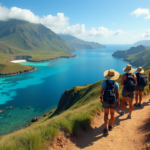
Diverse Landscapes in Close Proximity: Within a single day of driving, you can photograph active volcanoes, pristine coral reefs, ancient tribal villages, and cascading waterfalls. This concentration of varied subjects means you can capture an entire portfolio’s worth of diverse images without spending weeks on the road.
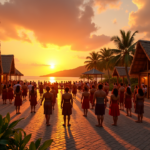
Authentic Cultural Experiences: While tourism infrastructure is developing, Flores has maintained its cultural integrity. The Manggarai, Ngada, and Lio people continue practicing traditions passed down through generations, offering genuine cultural photography opportunities rather than staged performances.
Uncrowded Locations: Even at popular spots like Kelimutu, you’ll share the viewpoint with dozens of visitors rather than thousands. This means cleaner compositions without tourists photobombing your shots, and more flexibility to set up equipment and wait for perfect light.
Golden Hour at Kelimutu: The Crown Jewel of Flores Photography
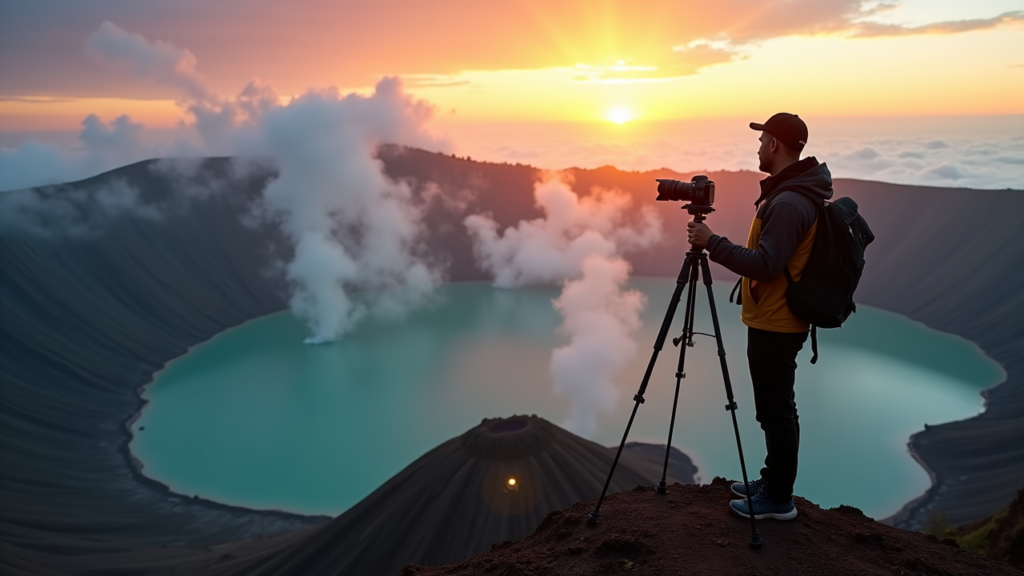
No photography trip to Flores is complete without witnessing sunrise at Mount Kelimutu. These tri-colored crater lakes have captivated travelers for centuries, and for good reason — the combination of volcanic geology, mystical local legends, and ever-changing colors creates images that stop scrollers in their tracks.
Understanding the Lakes: Tiwu Ata Mbupu (Lake of Old People) typically appears dark blue or black, Tiwu Nuwa Muri Koo Fai (Lake of Young Men and Maidens) shifts between turquoise and green, while Tiwu Ata Polo (Bewitched Lake) changes from red to brown. These colors result from volcanic minerals and chemical reactions that vary with volcanic activity and weather conditions.
Best Photography Strategy:
Arrive at the crater rim by 4:30 AM to secure your spot and set up equipment before the 5:30 AM sunrise. The thirty minutes before dawn offer the most dramatic lighting as the first rays of sun illuminate the mist rising from the lakes. This ethereal atmosphere creates depth and mystery that midday shots simply cannot match.
Equipment Recommendations:
- Wide-angle lens (16-35mm): Essential for capturing all three lakes in a single frame
- Telephoto lens (70-200mm): For detailed shots of individual lakes and color variations
- Sturdy tripod: Necessary for long exposures capturing mist movement
- ND filters: Allow slower shutter speeds for smooth mist effects
- Lens cloths: The crater’s humidity constantly fogs lenses
Pro Tips for Kelimutu:
- Check the weather forecast the night before — clear skies offer the best visibility, but partial cloud cover creates dramatic sky compositions
- Bring a headlamp for the pre-dawn trek up the stairs
- Don’t pack up immediately after sunrise; the changing light continues creating different moods for hours
- Consider hiring a local guide from Moni village who can explain the lakes’ cultural significance while you focus on shooting
Spider Web Rice Fields of Cancar: Geometric Perfection
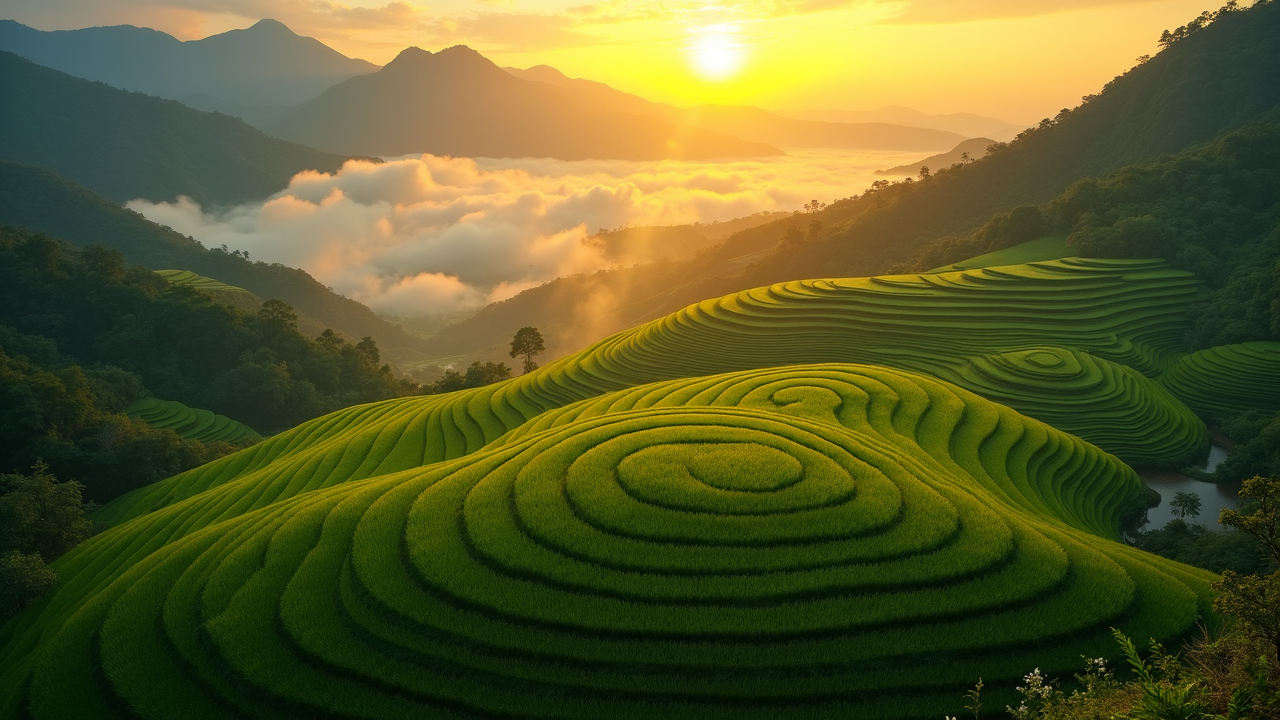
In the Cancar district near Ruteng, you’ll find one of Indonesia’s most unique agricultural landscapes — the lingko rice fields. These circular, spiderweb-patterned terraces represent centuries of traditional Manggarai farming practices and create mesmerizing geometric compositions that drone photographers dream about.
The Cultural Significance: Each section of the spiderweb pattern is owned by a different family in the village, representing a communal approach to agriculture that has sustained these communities for generations. The circular design isn’t just aesthetic; it represents the traditional Manggarai house (Mbaru Niang) and their worldview.
Photography Approaches:
Drone Photography: The spiderweb pattern only reveals itself from above, making drones essential for capturing the full geometric beauty. Fly at 100-200 meters for complete patterns, or lower at 50 meters for detailed texture shots. Early morning offers the best light with long shadows emphasizing the terrace ridges.
Ground-Level Perspectives: While drones capture the pattern, don’t neglect ground shots. Walking through the narrow paths between terraces offers intimate portraits of farmers working, water reflections in flooded paddies, and detailed shots of traditional farming techniques.
Seasonal Considerations:
- Planting Season (December-February): Flooded paddies create mirror-like reflections
- Growing Season (March-May): Vibrant green terraces with defined edges
- Harvest Season (June-July): Golden hues and active farming scenes
Traditional Villages: Portraits of Living Culture
Flores offers some of Indonesia’s most authentic cultural photography opportunities. Unlike tourist-oriented villages elsewhere, communities like Wae Rebo and Bena maintain traditional lifestyles while graciously welcoming respectful visitors.
Wae Rebo: The Village in the Clouds
This isolated Manggarai village sits at 1,100 meters elevation, surrounded by dense forest and frequently enveloped in mystical fog. The seven traditional conical houses (Mbaru Niang) create an otherworldly scene that feels unchanged for centuries.
Photography Ethics: Always ask permission before photographing individuals. Consider bringing a portable printer to offer instant prints as gifts — this builds goodwill and often results in more natural, relaxed portraits. Participate in village life before photographing; sharing meals and conversation creates authentic connections that show in your images.
Bena Village: Megalithic Mysteries
Famous for its megalithic stone formations and traditional Ngada houses, Bena offers dramatic compositions against the backdrop of Mount Inerie. The village layout itself tells stories of ancestor worship and community organization through its stone arrangements.
Cultural Photography Best Practices:
- Hire a local guide who can translate and explain cultural protocols
- Photograph during golden hour for soft, flattering light on faces
- Use a 35mm or 50mm lens for environmental portraits showing subjects in their surroundings
- Capture details: hands weaving textiles, weathered faces, traditional tools
- Respect “no photography” areas, typically sacred sites and ceremonies
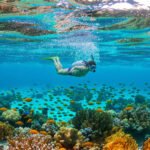
Underwater Paradise: Komodo National Park Photography
While Komodo National Park is famous for its dragons, underwater photographers know it as one of the world’s premier dive destinations. Crystal-clear waters, vibrant coral reefs, and abundant marine life offer endless opportunities for stunning underwater imagery.
Marine Life Highlights:
Manta Point: As the name suggests, this site virtually guarantees manta ray encounters. These graceful giants glide through cleaning stations, offering opportunities for wide-angle shots showing their impressive size and elegant movements.
Turtle City: Several sites around the Komodo islands host resident sea turtle populations. These photogenic creatures are accustomed to divers and often allow close approaches for detailed shell pattern shots.
Coral Gardens: The healthy reefs feature hard and soft corals in vibrant colors, with excellent visibility for wide-angle reefscape photography. Look for macro subjects like pygmy seahorses and nudibranchs among the coral.
Underwater Photography Tips:
- Wide-angle for mantas and turtles: Capture these large subjects in their environment
- Macro for critters: The macro life in Komodo is exceptional
- Strobe positioning: Essential for restoring colors lost underwater
- Red filter or manual white balance: Corrects the blue cast at depth
- Get close: Water reduces contrast; minimize the amount of water between you and subjects
Learn more about diving opportunities in our complete Diving & Snorkeling Guide.
Pink Beach: Nature’s Most Instagrammable Shoreline

One of only seven pink sand beaches in the world, this surreal location on Komodo Island offers photographers a color palette that seems digitally enhanced. The pink hue comes from microscopic red organisms (Foraminifera) mixed with white sand, creating a cotton-candy shoreline that intensifies during sunset.
Photography Strategies:
Sunset Sessions: Arrive 90 minutes before sunset to scout compositions and capture the changing light. As the sun lowers, the pink sand intensifies while the water reflects golden and orange tones from the sky. This color combination creates images that appear almost otherworldly.
Foreground Elements: Include interesting foreground subjects like coral fragments, driftwood, or unique rock formations to add depth to your compositions. The contrast between pink sand and these elements creates visual interest.
Human Element: A figure in the distance provides scale and emphasizes the vastness of the beach. Silhouettes against the sunset sky work particularly well here.
Technical Mastery: Camera Settings for Flores Conditions
Flores’ diverse environments require adaptable camera techniques. Here’s your technical playbook for capturing professional-quality images across the island’s varied conditions.
Landscape Photography Settings:
Aperture: f/8 to f/11 provides the best sharpness across your frame for landscapes. This sweet spot minimizes diffraction while maintaining edge-to-edge clarity for those sweeping volcano and rice terrace shots.
ISO: Keep as low as possible (100-400) to maximize dynamic range and minimize noise. Flores’ bright tropical light allows low ISO settings even during overcast conditions.
Shutter Speed: For handheld shots, maintain 1/125s minimum to avoid camera shake. Use a tripod for slower speeds when capturing mist movement at Kelimutu or water motion at waterfalls.
White Balance: Try the “Cloudy” preset for warmer, more inviting tones during golden hour. For sunrise at Kelimutu, auto white balance often works well as colors shift rapidly.
Essential Gear Checklist:
- Sturdy tripod: Carbon fiber models offer stability without excessive weight for hiking
- Polarizing filter: Essential for reducing glare on water and enhancing sky colors
- ND filters (3-stop and 6-stop): Enable long exposures for smooth water effects
- Extra batteries: Tropical humidity drains power faster; bring 3-4x your normal amount
- Waterproof bag: Sudden tropical downpours can appear without warning
- Lens cleaning kit: Dust, salt spray, and humidity constantly challenge optics
- Memory cards: Bring multiple high-capacity cards; you’ll shoot more than expected
When to Visit: Seasonal Photography Considerations
Understanding Flores’ seasonal patterns helps you plan for the specific images you want to capture.
Dry Season (April – November):
This is the peak photography season for good reason. Clear skies provide consistent golden hour light, underwater visibility reaches 30+ meters, and hiking trails remain accessible. However, popular locations like Kelimutu can get crowded, and the harsh midday sun requires careful exposure management.
Wet Season (December – March):
Don’t dismiss the wet season entirely. Dramatic storm clouds create moody, atmospheric shots impossible during clear skies. Rice terraces are at their greenest, waterfalls flow powerfully, and tourist numbers drop significantly. Carry waterproof gear and embrace the moody aesthetic.
Shoulder Months (April & October):
These transition periods offer the best of both worlds — generally clear skies with occasional dramatic clouds, manageable tourist numbers, and lush landscapes from recent rains. Many photographers consider these the ideal months for comprehensive Flores photography trips.
Find more seasonal travel advice in our detailed Seasonal Travel Guide.
Respectful Photography: Capturing Culture Without Exploitation
With great photographic opportunity comes great responsibility. Flores’ living communities deserve respect and fair treatment. Here’s how to capture authentic images while supporting rather than exploiting local people.
Always Ask Permission: This applies to individuals, private property, and religious ceremonies. A smile and gesture toward your camera usually suffices; learn basic Indonesian phrases like “Boleh foto?” (May I take a photo?).
Respect Sacred Sites: Many locations have spiritual significance to local communities. “No photography” signs exist for good reasons — honor them without question. Some ceremonies are private; your guide can clarify which observations are appropriate.
Support Local Economies: Hire local guides who understand cultural nuances. Purchase handicrafts directly from artisans. Stay in locally-owned accommodations. Your photography trip should economically benefit the communities you photograph.
Give Back: Share your photos with the people you photograph. A printed image means far more than a social media tag. Consider supporting community projects or schools in the areas you visit.
Instagram Strategy: Maximizing Your Flores Content
Creating stunning images is only half the battle — getting them seen requires strategic hashtag use and posting optimization.
Primary Hashtags (Use on every post):
#DiscoverFlores #FloresIndonesia #KelimutuLakes #KomodoNationalPark #LabuanBajo #IndonesiaTravel #TravelPhotography #SoutheastAsia
Location-Specific Hashtags:
#Kelimutu #PinkBeach #WaeRebo #CancarRiceFields #MountInerie #Ruteng #Ende #Maumere
Niche Photography Hashtags:
#DronePhotography #LandscapePhotography #CulturalPhotography #UnderwaterPhotography #SunrisePhotography #VolcanoPhotography
Engagement Tips:
- Post during optimal times (7-9 AM and 7-9 PM in your target audience’s timezone)
- Use Instagram’s carousel feature to tell complete stories
- Share behind-the-scenes Stories of your photography process
- Engage authentically with other Flores and Indonesia travel accounts
- Tag @DiscoverFlores for potential feature opportunities
Night Photography in Flores: Capturing the Island After Dark
While Flores is renowned for its spectacular sunrises and golden hour landscapes, the island offers equally compelling opportunities for night photography. From moonlit volcanic peaks to star-filled skies free from light pollution, Flores after dark reveals a different kind of magic.
Night Photography Opportunities:
Urban Nightscapes: Towns like Labuan Bajo and Ende offer opportunities to capture local life after sunset. The contrast between warm interior lights and cool tropical nights creates atmospheric scenes that tell stories of daily life in Flores.
Stargazing and Astrophotography: Away from major towns, Flores offers exceptionally dark skies perfect for Milky Way photography. The dry season (April-November) provides the clearest conditions, with minimal cloud cover and low humidity.
Moonlit Landscapes: Full moon nights transform familiar daytime locations into ethereal scenes. Kelimutu’s crater lakes under moonlight offer completely different photographic possibilities than sunrise shoots, with softer shadows and mysterious atmospheres.
Technical Tips for Night Photography:
- Tripod is essential: Exposures will be several seconds to several minutes
- Use manual focus: Autofocus struggles in low light; focus on distant lights or use live view
- ISO 1600-3200: Modern cameras handle these sensitivities well; don’t be afraid to push higher
- Aperture f/2.8 to f/4: Wider apertures capture more light, but test for sharpness
- Long exposure noise reduction: Turn this on for exposures over 30 seconds
Safety Considerations: When photographing at night in rural areas, always inform someone of your location. Bring a headlamp with red light mode to preserve your night vision, and consider hiring a local guide who knows the area after dark.
Final Thoughts: Your Flores Photography Adventure Awaits
Flores represents something increasingly rare in travel photography — authentic beauty that hasn’t been over-photographed into cliché. The images you create here will be genuinely yours, capturing moments and perspectives that reward careful observation and creative vision.
Remember that the best photography comes from patience and connection. Don’t rush from location to location ticking off shots. Sit with the morning mist at Kelimutu. Share stories with villagers in Wae Rebo. Watch the light change across the rice terraces of Cancar. These moments of presence result in photographs with soul.
Flores rewards photographers who respect both the land and its people. Approach your journey with humility, curiosity, and openness, and you’ll return home with images that do justice to this extraordinary island.
Ready to start planning your Flores photography adventure? Explore our comprehensive Flores travel guides for detailed itineraries, accommodation recommendations, and insider tips. Whether you’re planning a dedicated photography expedition or simply want to capture memories on your vacation, Flores promises images you’ll treasure for a lifetime.
Share your Flores photography with us using #DiscoverFlores for a chance to be featured on our website and social media channels. We can’t wait to see the unique perspectives you capture!
Frequently Asked Questions About Photography in Flores
Do I need a drone to get good photos in Flores?
While drones capture unique perspectives (especially at Cancar’s rice fields), they’re not essential. Ground-level photography at Kelimutu, cultural portraits in villages, and underwater shots in Komodo all offer incredible opportunities without aerial equipment.
Is it safe to bring expensive camera equipment to Flores?
Yes, but take normal precautions. Use hotel safes when not shooting, avoid displaying expensive gear in isolated areas, and consider travel insurance that covers photography equipment. Violent crime against tourists is rare in Flores.
Can I hire local photography guides in Flores?
Absolutely! Local guides offer invaluable knowledge about the best viewpoints, optimal timing, and cultural protocols. They can also facilitate introductions in villages and explain the significance of locations you’re photographing.
What’s the best camera for Flores photography?
Any camera you know well works. Professionals prefer full-frame DSLRs or mirrorless cameras for dynamic range and low-light performance, but modern smartphones capture stunning images in Flores’ excellent lighting conditions.
Are there any photography restrictions I should know about?
Yes. Always respect “no photography” signs at sacred sites. Some villages charge small fees for photography or prohibit it during ceremonies. Your guide can clarify current rules, as they may change.